
Stepping up
This blog is designed for intermediate to expert painters, my articles are usually aimed at beginner painters.
Definition of step up
1: to increase, augment, or advance especially by one or more steps
The team really stepped up their performance.
Introduction
This blog is focused on three things eyes, gemstones and non-metallic metal/true metallic metal. Unlike usual this will vary by the number and there is a reason for that, the better you get at something the more conservative you will become about it. You will develop a routine and route patterns, once these patterns are developed then you can try deviating from them. There are known and predictable results from following the steps presented.

This Image is by Arcane Paintworks
The eye is largely based off the tutorial by Arcane Paintworks, it is the tutorial I have had this blog on my bookmark for half a decade now. This is the first thing you need to learn when stepping up, there is nothing new under the sun, you are on the shoulders of giants. Not only is that nothing to be ashamed of, but it is also something that should give you hope because people have been through all of this before.
Eyes are often considered the hardest parts of painting models. I put it first because it's important to understand, that stepping up is a process. Even I don’t follow every step of this guide I linked. in fact I stop at step four why?
Verisimilitude
[ ver-uh-si-mil-i-tood, -tyood ]
Definition of verisimilitude
noun
the appearance or semblance of truth; genuineness; authenticity: The play lacked verisimilitude.
something, as an assertion, having merely the appearance of truth.
We are not trying for Realism and to try for realism at this scale is a fool’s errand. Most miniature artists are working at 28mm to 32mm scale, keep your goals realistic. Second of all, keep this maxim in mind when looking to step up your abilities.
It doesn’t matter how good your technical work is if it doesn’t look good. In the end, nobody cares how skilled or talented you are if it doesn’t look good.
It is a harsh truth, but when I say there is no such thing as cheating, the reason I say it is something looks good or it doesn’t and it doesn’t matter if the ‘community’ considers it cheating.

Eyes
Eyes are the window to the soul - William Shakespeare
First, before I tell you about how to paint eyes I will tell you about Mass Effect Andromeda
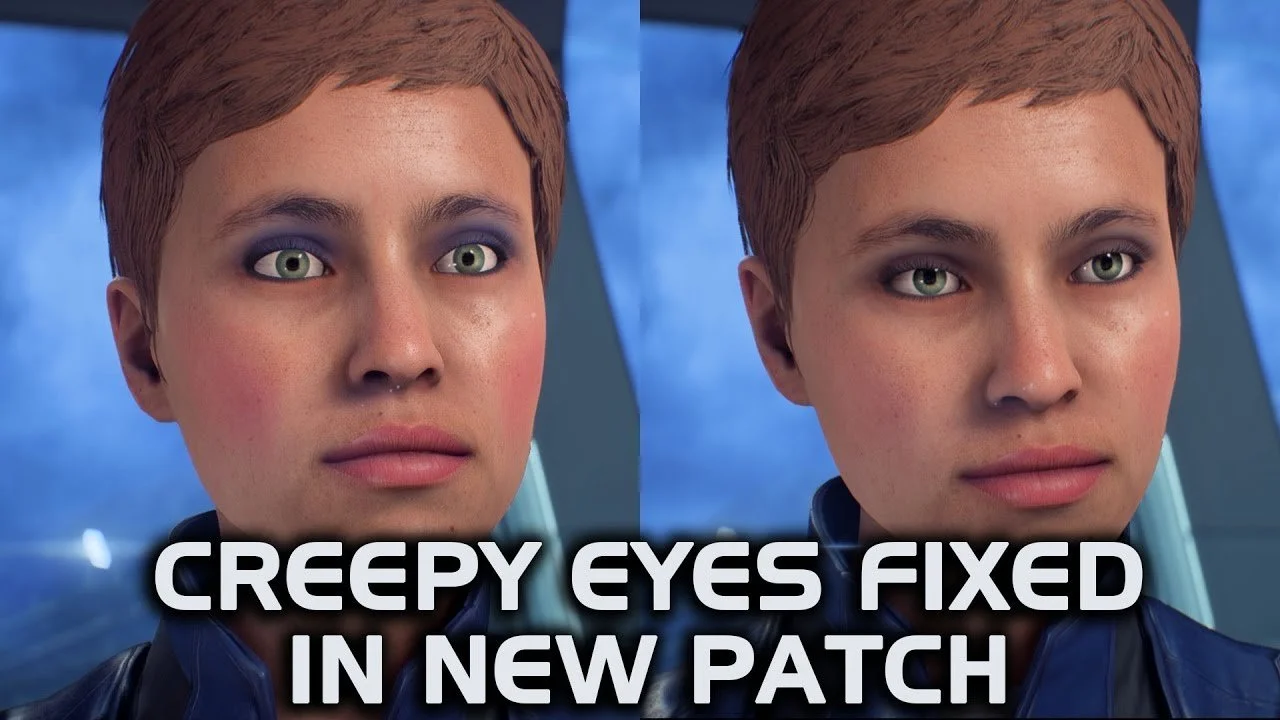
Bit of quick inside baseball. The reason eyes are so hard is we are pattern recognition matches, this is why we rose to dominate our world, one of the biggest reasons was our ability to communicate. Humans are the only species of animal with this much white in their eyes, the reason for this is so we can communicate where we are looking. There are over 37,000 scientific papers on gaze studies alone.
The reason the left picture looks creepy is that there is too much white in the eye and the pupil is too dilated meaning that it is showing signs of the fight or flight response being triggered in the person. Along with a healthy dose of the uncanny valley.
This is why the eyes are painted in the way they are, the focus is on verisimilitude. We are trying to give the appearance of reality because if we try for the reality we are going to be sitting in that valley. along with Mass Effect.

This visual guide is great but my steps are a bit different, my reasoning is that Meg’s steps are focused on display-level painting for larger models my method is focused on painting 28mm to 32mm models and only uses three steps.
Darken the area
Off Whiten an area within that darkened area
Dot with the eye colour
Brushes
Before I continue, it is important to talk about your brush. You are probably nervous if this is your first time doing eyes, so you got out your smallest brush. Wrong, don’t do this, your paint will dry before you get it to the eye area. Use a brush one step down from the brush you are most comfortable with, for most people, this will be a size 1 or size 0, not a 00 or 000 or as some miniature brand companies would call it extra small or tiny.
Step 1 Darken the area
The reason we darken the area is to increase the contrast between that of the model’s skin and the rest of the area. Some skin may be so pale that the eye’s whites will almost match the skin. This can be done in one of three ways.
Blacken the area (use near black not an absolute black in terms of citadel paints this would be Covrus Black, not Abaddon Black)
Darken the area with your skin tone darkened two shades darker. Remember you want to darken only not adding other colours especially red, indicates other things.
Flood the area with a shade/wash, this can be especially useful if your model has a raised eye area it will help you locate the eye area more easily and it does have a naturalistic tone, and you have less room for error.
Step 2 Whiting the area
You must use an off-white to white the area while leaving some black however, this also depends on the skin tone of the model you are doing. Remember your goal is verisimilitude not reality. If you are painting Anglo-Saxon skin tones, creams with red undertones, Mogahast Bone is more appropriate than say Wraithbone, which is too white. By the same tone if you’re painting Nilo-Saharan skin tones (some of the darkest skin tones) you may want to use Zandri Dust. Remember we are not trying for reality we are trying for the appearance of reality, not reality, verisimilitude. By the same token if you are painting an unreal skintone say such as blue, consider using a grey rather than a cream or mixing your own ‘off-white’ by mixing 90/10 or 95/5 with the skintone with a pure white as your off-white.
Step 3 Your iris colour
Select the colour you wish the eye to be, for almost all miniatures this will be your final step. Now, why do I say stop here? Quite simply, what is our goal? Verisimilitude. When it comes to miniatures it is a heightened reality not actual, so the colour is more important because people will look for the colour not, for the black. And unless your selected colour is very light it will look like the darker colour from the distance.
Place the dot so that the white is only barely visible from the bottom and you cannot see it from the top like in the picture.
Additional steps
Why stop at the step before? Verisimilitude. However, there is another reason. Eyes are so easy to stuff up. And we are pattern recognition machines this means that the slightest error will be picked up easily. The next two steps are the same as those shown by Meg from Arcaneworks.
Remember you’re talking about the white dots that are going to be a micron in size there is a lot of room for error.
Conclusion
Eyes are going to be one of the hardest things to step up because of one thing above all else, human nature. We are pattern recognition machines and we focus on the human face more than anything else in life, and there is one thing we focus on above all other things, eyes. This isn’t a bad thing, because knowledge is power, knowing that eyes are very difficult means you will be more forgiving of yourself and if you’re not you should be. As always painting is a physical skill and knowledge is only one part of it. You must train to use these skills. A difficult task is not made easy by avoiding it.

Gemstones
The gemstone technique is very useful because it is used for more than gemstones. Indeed it is used for quite a few different things, but the most important one is the one we just followed from lenses. That’s right both techniques learnt here are for eyes.
However, the first thing you must understand the gemstone technique is about the picture shown above, that’s it that is all it is trying to emulate. It isn’t trying to do any other type of gemstone, it’s not trying to show off engagement rings or multifaceted gemstones or uncut gems. Why?
Say it with me now
> verisimilitude <

Image from Goonhammer
I looked for a lot of different images on how to explain how light diffusion works but to be frank Goonhammer’s explanation by Robert “TheChirurgeon” Jones does it best.
Light
Understanding light is the most important part of stepping up we will talk about the golden angle and other things at another point in time.
The first thing you must know before painting gemstones is where does your light come from? I am not talking about object source lighting like from a torch, flashlight or candle. I am saying where does the main source of light come from for your model, is it above which angle is it directed?
If you don’t know, and you have a box art face your model until it matches the box art, now imagine the light coming 75 degrees above it from the sun.
The reason this is important, I am going to say a lot of things that repeat but what are humans?
Pattern recognition machines
If each of your gemstones are done as if the light is coming from a different direction… well then… people are going to look at it and they won’t know why but they won’t like it. They may not even tell you but if you closely look at them as they look at it, you will recognise those telltale signs.

Step Zero
So step zero is to determine where your light comes from.
The easiest way to do this is if your miniature has box art or has art for a Kickstarter or anything else. Look at that art face the miniature that way and pretend as if the light is coming from a sun at a 75-degree angle above the miniature.
If you don’t have that or you don’t want to do that simply select a point on the miniature and then pretend as if the light comes 75 degrees above the model.

This gemstone technique is for any colour
How to paint gemstones
The process in short
Paint the area black
Paint a waxing gibbous (reverse crescent) of 50/50 black and your colour
away from the light sourcePaint a crescent covering 75% of that gibbous with 25 black/75 your colour
Paint a crescent covering 75% of that crescent which is purely your colour
Paint a crescent covering 50% of that crescent which is your highlight colour
Paint white dots in the black area representing the reflections

Highlight colour
Especially for gemstone, the highlight colour should be a pushed highlight, not just adding white to the colour. This is a more general thing but when highlighting a colour it is better that you add a saturated colour (intense colour) to the colour you are highlighting. For example pushing red into orange by adding yellow, adding magenta to purple, adding yellow to green and so on. There are many different ways to push colours.
Additional steps
As always I don’t believe I am the be-all and end-all of these techniques indeed there are many ways you can improve on this technique. There are additional steps I could add to this and the reason I don’t is that I am trying to show you the various ways you can step up without being overloaded. but as an example, your colour to blend all those colours together to give a beautiful gradient and so on.
Conclusion
The gemstone technique is used for lenses, and you will find it quite useful throughout your hobby career but unlike before, there is no single source that I took this from. Indeed there is the Goonhammer thing but, I found the original website I first learned about this technique from. Don’t think of my short introduction here as the end. If it’s all you need I’m flattered I could help you, however, I hope for most of you this is just the start as such I would like to link you to some other people’s tutorials on this just like I did for the eyes.
Necrotales Gemstones (The original I learned from so many years ago)
Goonhammer’s Gemstones, Lens and Vials
Vincy V the King of Technique and but not presentation video tutorial

Non Metallic Metal and
True Metallic Metal
These two techniques are often known more commonly by their acronyms NMM and TMM. Non Metallic metal comes from the world of traditional painting. Traditional painting does not use mica flakes or glass flakes, that component of metallic paints that gives it shine. So they must give the appearance as if it is shining. This is done through an advanced understanding of light sources.
Understanding light is the most important part of stepping up, but I repeat myself. While light diffusion as a concept is more difficult to understand than reflection the execution of gemstones is far easier than that of non metallic metal. The reason for that is…
The reason this is important, I am going to say a lot of things that repeat but what are humans?
Pattern recognition machines
Yes, I am repeating myself but there is a reason for it. We are, we can’t help it, we are pattern recognition machines and non metallic metal is the uncanny valley of miniature painting. Reflections are very difficult to understand when trying for: heightened reality, like we do in miniature painting. Because the slightest mistake and all of a sudden people are like… that doesn’t look right.
It is for this reason, I dislike non metallic metal
I say that to be upfront and honest, but the reason I point this out is because despite people online having considerable regard for it. They also look at almost everything in two dimensions like most traditional painters and digital painters. They don’t look at things in three dimensions almost ever. Because photo technology and film are two very different things and getting precise shots with film and getting precise photos are two very different things.
Non metallic metal is made for the static image and does not respond well to being moved about in the hand and has that uncanny valley feeling when you do.

Understanding reflections
Unlike all of the previous information I have presented there is no one source or even group of hobbying sources I took to explain non metallic metal or true metallic metal because, it comes from the plain old art world and it can get very deep. How deep?

Understanding non metallic metals, when put in this way, is extremely intimidating and why do I do this upfront when everywhere else I have said just do the easy version? Don’t do the difficult version.
The answer is simple, I am letting you know that this topic has a level of depth that most hobbyists aren’t prepared for, for one reason above all.
They are hobbyists. It’s a hobby its not work. This if you ask me looks like work and to you it may look simple or this is what you enjoy. More power to you. However, I never learned my roughness vs anisotropic (directionality) value indexes. All I learnt was simple. I learnt it through observation. You are trying to repeat nature. Try and draw on that.
Observation is your biggest tool, you are not here to learn paint trigonometry from me nor am I able to teach it. All I am saying is to learn how to use this technique the most important thing is to use your eyes.
How to paint non metallic metal

First question. Where is the light coming from in this picture?
You must be able to answer this question before you start painting.
If you have trouble with this picture it maybe due to the fact that it is a three-dimensional render of metallic droplets, then chose a real photo, without any obvious shadows. Because you must be able to tell the directionality of your light source by simply looking at the metal and nothing else.
This is the most important part of painting non metalic metal.

Second, unlearn standard painting practices
For standard painting, you have three base things, your base (sometimes called shadow), your mid-tone and your highlight. You paint your base and highlight up in the lighter areas preferably making a nice blend between shadow and highlight.
For metallics, you go as bright as possible as quickly as possible to try and show the idea of reflection. Your darks will switch much more starkly to dark much more quickly because what you are trying to do is show the idea of the reflection.

Third, colour choice
Colour choice is far more important than usual with miniature painting. If you select, the wrong set of colours you may be painting a style of metal you didn’t intend to paint. Iron is much more dull than steel and brass is much more dull than gold. Your iron may turn into silver with a different colour choice.

There are easy ways of getting around this problem which is that some companies have already developed paint lines for this exact purpose. Scale 75 is one such company.

However, you can make your own colour swatches except you should do a little research. Into what you are trying to paint so that you know what it is that you are trying to emulate.
Conclusion
Avoid all of that and paint True Metallic metal.
How to paint True Metalic Metal
The way you paint True Metalic Metal is exactly the same as that of painting non metalic metal except with metallic paints.
Okay, so you just explained why non metalic metal is such a pain to paint but then you say use the exact same techniques but with metal paints…. how does that help?
I hate to sound like a broken record but, the reason this is important, I am going to say a lot of things that repeat but what are humans?
Pattern recognition machines
The difference between non metallic metals and true metallic metals is one thing. The inherent desire to believe
Anthropomorphic
[ an-thruh-puh-mawr-fik ]
adjective
ascribing human form or attributes to a being or thing not human, especially to a deity
We are pattern recognition machines however there is a problem with that, I want you to read the the sentence I am writing right now and I want you to tell me what is wrong with it.
I will give you a minute.
Did you see it the first time?
No, you didn’t because you’re pattern recognition machine, and you are trying to decipher what is is that I am saying not looking for errors. You deliberately ignored errors because you want to see what I have done right. So why do we do that, but with faces we are so persecutive? Well because deceit could cost us our lives, whereas the transfer of information, is more like to preserve our life.
With the addition of mica flakes or glass flakes there is a reflective surface catching the light with the metallic paints. We want to believe. Why it is… I am not 100% sure, but I know that true metallic painting has more room for error and you have a better chance of learning and leveling up from there.
In short, when someone moves the model in their hand, they are more likely to say…

Finale
I hope this article has been educational and helpful because those two things don’t always cross over. This has been my largest article since ‘Starting from Scratch’ it is my sincere hope you get something out it, something useful. I hope this is something you can pass on to people.
But most of all…