
First Steps
This blog is designed to be a comprehensive first step for if you have started your painting journey. If you are beginning your painting journey please check out this blog. ‘Starting from Scratch’ is about beginning your paint journey, a step zero if you will.
Like ‘Starting from Scratch’ this will be a more comprehensive guide to beginning in the painting world. As such before I have even begun writing this I will add this which I also used with starting with ‘Starting from Scratch’.
Also, I have added a fair number of videos, the reason for this is a lot of the time I could write all the words in the world and even add pictures but seeing a process live just hits different. Just be warned there are a fair few in here but they are optional.

However, this is designed to be a comprehensive first step. So let us begin.
Why are you painting?
It’s a pretty simple question. Why are you painting? I am not looking for the existential answer. I am asking you seriously and honestly. Why are you painting?
You may have noticed that’s hyperlinked and there is a whole but short article there but this is your very first step before you continue painting. If you have taken the time to look this up there is a reason for it. I am going to give some options
So you can play the game?
For self-improvement/improvement of your painting
For relaxation/the process of it
Figuring this out is vastly more important than any one technique or bit of advice I can give you.

Painting is a physical skill!
In my opinion, this point is not pushed with new painters nearly enough. A lot of people look at something like this and through education, we are fed the exact same route learning process but it’s SWEARING BAD WORDS. Here is the thing, painting requires the development of muscle memory or to be more specific, fine motor memory. It doesn’t matter how much you know when it comes to painting your skill and knowledge must match your ability to move forward. Unless you know how to paint, you are going to be able to improve no matter how much information you take in. Remember that, if you don’t improve your physical skills all the knowledge in the world is useless.

Priming models
As in all things, it is the foundation of things that is the most important.
A wise man builds his house upon a rock and a fool upon the sand.
When you don’t prime models your paint simply won’t stick, you probably already know that… what you may not know is this… mould release. Would you try and paint your model after dipping it in this?

Why do I say that? Who dips their models in oil?
Every single major miniature manufacturer.
That is correct every single major miniature manufacturer, see in one of my many lives, I lived as an injection mould worker along with my friend who is a plastics engineer specialising in injection moulding. Why do I say this? In the vain hope that you might listen because a lot of people are resistant to this fact. See one of the products we use is mould release, which is, grease and oil.
That is what is covering your sprues when you get them.
The solution is simple and is actually something that is easy and makes you more motivated to start with your hobby projects. Just open up your box, blister, or whatever you have and fill a sink with some warm water and a small (SMALL) amount of detergent. Now put your sprue in and scrub it with a soft toothbrush and then run some cool water from the tap over it and that has gotten rid of the mould release.

I am going to talk about ‘how to prime models’ in a moment but first we should talk about equipment. Now the first thing is this, I recommend buying an airbrush just for this. I am not talking about learning airbrushing as your first step up I am saying just priming. Here is why.
Games-Workshops spray primers cost an average of $32 (AUD) as of November 2022, lets say you are going to use the Zenithal priming process I am going to lay out. That means you would need three cans Chaos Black $31, Mechanicus Standard Grey $32 and White Scar $32 for a grand total of: $95.
Now I recommend cheap airbrushes for priming not good ones the cheaper the better, they aren’t meant to do fancy things they will have primer paint running through them. So cheap airbrush $20 cheap compressor $30 SMS Primer SURFACER BLACK $13 SMS Primer SURFACER GREY $13 and Primer SURFACER WHITE $13 comes to a grand total of: $89
It comes in cheaper when you make the initial purchase of the machinery itself…
Not to mention I am talking about exclusively what I work with, I am not saying one thing and doing another, though I will recommend that in some areas, because I am a buffoon who doesn’t take my safety seriously. (Editor/ Wife’s note: Yes take your safety seriously you Buffoon)
Vallejo Surface Primer Grey 60 ml Miniatures $10.99
Badger Stynylrez - Acrylic Airbrush Primer - Grey - 60ml $13.00
AK interactive White Primer (100ml, 3rd Generation) $13.50
MIG One Shot Primer - White (60ml) $11.95
I hope that I have shown why you should have an airbrush.
Bellow shows how to do the technique, Zenithal Priming.

As I said before, I am a bufoon. See one of the key ways to make sure your prime is super clean is something I am not as good at and perhaps it is because I am a commission painter and that is, Waiting.
It is recommended that between each of these steps you wait 24 hours for the paint to dry and set, and for idle conditions, you should wait three days… You can see why I am bad at this.

Techniques
Before you begin your painting journey you must learn that behind a lot of different styles of techniques there is an underlying idea behind them. For example, edge highlighting, it is a key part of the ‘eavy metal style, which focuses on bringing out the key features of particularly detail-dense models this is the go-to style for Warhammer, which you may hear referenced as the Citadel or Games-Workshop style. This does not make it the best style and many professional painters dislike it but you will hear me repeat myself a lot here this is one of the key points.
If it works for you, it works for you, so don’t worry about it.
Washes/Shades
First off I am going to be using the shortest and most useful video tutorials because seeing them done is often very helpful for people. I will also try and use the expert from the field, army painter is the expert in washes and dips.
Washing is sometimes called ‘liquid talent’ the name was recently changed by Games-Workshop, they started calling them shades several years ago, but for the longest time, they were called washes. So if you hear someone say washes or if you hear them say shades the term is interchangeable.
Washes are a high viscosity, high transparency paint, which doesn’t cling to surfaces well. Because of these qualities, it will settle in the recesses more than that of standard acrylic paint. This is used to accentuate the depth of models and is extremely useful for two primary areas: Furs and Scales. Any model that has continuing patterns where depth is sculpted into the model it is useful, for example flowing capes are great for washes, but flat still capes are not due to the fact that they will have no folds.
Personally, I dislike washes for one reason but that doesn’t mean I don’t use them in certain circumstances. The reason I dislike washes is because of the standard Warhammer style of painting.
Almost in every single Warhammer video, you watch it will go like this.
Paint on your base paint, now apply a shade paint to that area, now reapply your base paint to everywhere but your recesses.
This is why I dislike the use of washes because they know that once you apply a wash you will no longer be able to colour-match your paint if you make errors when you paint. You could avoid this with layering, just layer up rather than using a wash, washes are best when they are used as a last step.
Also, remember that washes can be controlled just like any other paint by removing the wash while you work with it.

Drybrushing
As with most of these techniques, the trick is in the name. Drybrushing is using your brush with dried paint on it so you only hit the raised areas of the model. Think of it as the opposite of a wash/shade and this is why I talk about this second.
With these two techniques, you can paint up just about anything with a low-skill floor and get great results if the miniatures are of a higher quality. The higher the miniature quality the better these two techniques will bring out the details of sculpting. Before we begin we must talk about equipment.
Drybrushing has a bad reputation as a beginner-only technique and a lot of people will try and sell you a lot of junk. I am going to tell you what I use, I use two types of drybrushes, one is the harsh drybrush made by Games-Workshop and is my go-to when wanting instant results. Now, this doesn’t mean it is the best drybrush it is a horse hair/hog hair brush to the best of my knowledge. The second thing that I recommend is
“Jessup 15 set zinfandel t284”
Listen I won’t recommend a specific product often but here I will. If you read starting from scratch you will have seen me recommend this before. This is a makeup brush set and make-up brushes are the second part of the equipment list for drybrushing. The difference is that makeup brushes give a smoother much lighter touch when it comes to drybrushing. That sounds great but just like what was found with coffee research, people say they want ‘Rich, dark, flavourful, aromatic coffee’ but in reality, they actually wanted ‘watered down, foamy milky, sugary coffee’ call me wrong if you want but Starbucks certainly knows what people actually buy.
Actual Technique
Get your brush and get a paint, it doesn’t have to be specifically drybrush paint, then using a paper towel use a back-and-forth motion to remove most of the paint. If unsure of the amount, brush the connection point between your hand and wrist where your natural movement wrinkles are most pronounced. If you have the right amount it will be on the top of your skin but not within the wrinkles. Once you have the desired amount on your brush, apply it to the model in a stroke that matches wherever your light source comes from. So most of the time that will be from above so create repeated downward strokes to emulate where it comes from.
Specific notes: DO NOT use tissues, it must be at least the density of paper towel you can use cardboard, as some people do but do not use tissues. This is a disaster waiting to happen.
Advanced Technique
Here is the thing, with most of these techniques there is actually a lot of depth to them however, I am just going over the basics. Drybrushing is given a very, very bad wrap, but it is actually in my opinion one of the two go-to techniques for beginning painters, not because it’s easy but because it has a low-skill floor. This means it is easy to get to grips with and it actually works very well in combination with our next technique which like washes some people may not think is a technique. Drybrushing’s best advanced technique in my opinion is simple, just using that harsher drybrush at the start and then using a makeup brush to blend it out. There is a whole world of drybrushing to explore and Artis Opus are the people who do most of it. Explore with them however unlike washes where it is all about control I am going to leave a few links for you to explore from YouTube to learn more about my favourite slagged off technique.
Ninjon - Higher level Drybrushing 17:49
Artis Opus - METALLIC PAINT DRYBRUSHING! - 23:35
Zumikito Miniatures - Make-up Brushes Techniques 10:40

Contrast Paint
Speed Paint, Instant Colour, Xpress
Contrast paint is not so much a technique…
Well yes and no. What Contrast paint is, is a tint. The problem with contrast paint is it requires some more advanced knowledge to be used in very advantageous ways. I use contrast paint with my commission painting for character-level paint jobs but only in very specific areas.
But if you can only remember one thing about what I said about contrast remember this, it’s not one thick coat!
And to be honest I very much dislike contrast paint for the exact same reason I dislike washes. Once it is put down you have very little room to move. However, if you think of contrasts as a base. You are going to do a lot better. First off, Contrast paints go great over a Zenthial Prime because you have already set your values, this means the lights and darks for your paint job. However, It can be used in more advanced ways.

Which part of this model is contrast painted?
Taking a look at this model You wouldn’t think a great deal of this model is contrast painted. However there are two key areas. The first area is pretty simply. Its the boots which you should be getting a good look, the values were already set by the Zenithal Prime but after that doing additional highlights and edge highlighting in specific areas allowed the boots to look as if there was hours of work done blending the black. Black Templar contrast is one of the few contrast paints that I consider to be one of the best in the range. However, the real star of the show is this.
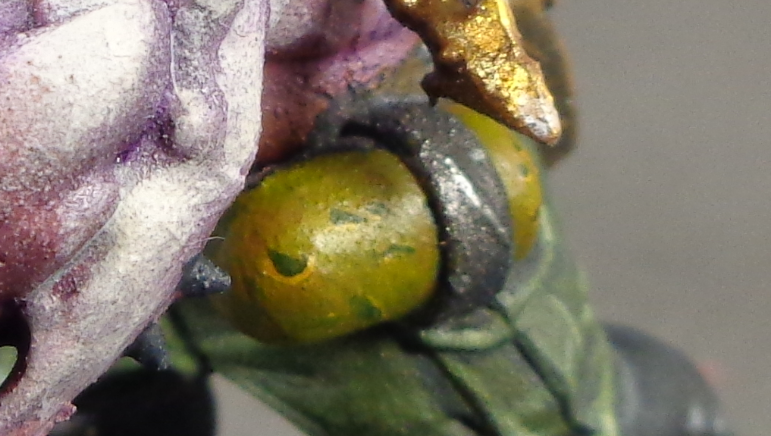
Trying to do dints and scratches with yellow can be a delicate process as yellow is already a tricky to work with colour in addition to adding dints and scratches with yellow on a gradient, you are asking for trouble. So the easy answer is don’t use yellow.
And so I didn’t use yellow to paint in those scratches. But who are you to believe, me or your lying eyes?
The answer is simple, I painted them in with greys, blacks and whites. I did all of the work before I applied the contrast paint, which simply tinted all of the work I did before. This means all of your work is done before hand with the values set and your contrast paint simply applies a transparent colour to your work.

The dog has two types of contrast work done with it, first, off you can apply contrast in layers, for example, it has Gore-Grunter Fur (a very strong contrast) on it in some areas but I only ever apply contrast paint in a thin way to get better results. I apply it in its normal consistency and then I wick away the rest with a barely wet brush. Then with his face, while the contrast was still wet I used Zandri Dust while the paint was still wet to blend the paint giving it a naturalistic look. And of course, over the Black Templar, I did standard highlighting. Contrast paint works best when used not as a be-all and end-all, but as a tool.

Finally mixing. To get that beautiful navy blue I mixed Black Templar contrast paint with Phthalo blue by Kimera Kolors. That’s right not only mixing colours but paint ranges as well. But the only reason I can ‘experiment’ and on a commission no less, is because I actually know these two colours so well. The dog above, his blue is Phthalo blue by Kimera Kolors and all of their boots are Black Templar contrast. It’s about knowing your paints and how to use them and this brings me to the elephant in the room.
There is no consistency
This is by far my biggest problem with contrast paints. When you get a usual Citadel paint you actually have a pretty good idea of what your getting, ‘Base’ paints will be high opacity, high pigment, good coverage, ‘Layer’ paint with be lower opacity, lower pigment, and lower coverage. However, with contrast paints you’re walking into the lions den with a stick, an axe or a machine gun and you don’t know which til you get there. The problem is its opacity, stickiness, pigment level and even glossiness is unknown! You have to work with contrast paints before you can trust them. While this is true for all paints, you can grab any army painter paint, P3 or Scale 75 paint with one paint and have a good idea what the rest will be like. This isn’t true for contrast paints so. I leave you with this warning.
Caveat emptor
Let the buyer beware

Darren Latham Warboss skin tutorial.
Layering
This is by far the most important technique and unfortunately as you can see by the picture. It is vague in a way, you simply apply layers of paint until you get the desired effect, that is the technique in short but there is a lot to it and this is why we Zenithal Prime. This helps determine your values which means where you should apply the darker paint and where you should apply the lighter paint. Layering is done by putting a successive series of paints over one another to create graduated layers of an effect such as veins popping out, muscles, ridges along a spine and so on. The number of uses for layering are literally endless.
This is literally the best video I have ever seen that explains layering in just five minutes. I could put an endless wall of text here to explain how to do things but in my opinion this video by Zumikito Miniatures is the best explanation bar none.
Because of this, and because it is an especially visual technique with such depth instead of fumbling with words I am going to leave you in safe hands with three links, which increase in their intensity and length as the list goes on.
How to Layer paints with Duncan - Citadel Warhammer video 7:41
Layering Tips, Tricks and Techniques - Vince Venturella 11:51
Understanding Thinning Paint Layers, Glazes & Filters -
Vince Venturella - 19:31
There is only one thing I will add.
Two thin coats is a lie
I am sure you have all heard Duncan’s infamous phrase, just add two thin coats. All I have to say to that is

And I am not the only one who agrees, coverage, is the key and moving your paint. Don’t paste it on like you’re applying a paste glue. Spread it around! It’s not hard. You don’t need two thin coats. Sometimes you do sometimes you need four or five to get a good opacity especially if you are dealing with orange or yellow. IT DEPENDS what you are working with. Don’t let a meme rule your painting life.
And just to prove I am not crazy here is someone with big numbers who agrees with me.
Finally it is time for the last technique I am going to be talking about, and much like the parts of the 90s you’d rather forget and the parts of the 90’s you never knew existed, for a month everyone was obsessed with gorgonian chant it’s… Edgy

Edge Highlighting
I didn’t talk about regular highlighting because it’s basically a part of layering and many of those videos would have gone into it but edge highlighting is a very specific kind of highlighting and super stylish, radical and edgy.
Okay, I will stop. Edge highlighting is what it says on the tin, highlighting the edges of a model it is particularly prominent in the ‘eavy Metal style of painting where painting the edges of particularly detailed dense models helps show off these fixtures.
The biggest downside of edge highlighting is it is skill intensive and it is time intensive. These are two things I hate, and most commission painters hate them. Because if not for this reason then for reason two. However, the actual knowledge behind edge highlighting is relatively simple I made this simple picture to show you how to do it.

As you can see the actual theory behind edge highlighting is extremely simple… the problem is that the theory means nothing without practice. See edge highlighting is what you call a high-skill floor technique meaning, that you need a great deal of skill just to get to grips with it. It is for all of these reasons I dislike it and I think it is particularly unfair that this is one of the number one painting techniques used by Games-Workshop for their models. Even they recognise this because they show or recommend it in almost any of their paper painting guides and very few of their online instructions.
However, with all of this said I like always would like to recommend another video this time by a good friend of mine who is an absolute master of this technique.
I really hope this helps because I think he is the master of this technique and his style and approach is quite personable.
When done correctly this is perhaps one of the most impactful techniques you can use on miniatures but Ninjon has a supercut where he tries the Games-Workshop style and even in the short tutorial supercut, he becomes tired because let me tell you if you want to paint like they do… there is a LOT of time-consuming techniques, which don’t necessarily make the model look 100% better but maybe just 10% better, which can be a massive amount at high-level painting but remember… Why are you painting?

Basing
When looking for based miniatures, I found very few pictures of miniatures but a surprising amount of pictures of badly photoshopped people with huge chins, so I just went with it.
Basing is my wheelhouse and why? Because it’s low effort, high impact! Basing your miniatures should be easy, anyone who has taught you that it is not… well they're just wrong.
Miniature basing is very easy if you have the right steps. First thing you want to know about is creating your base layer. This will not always be applied first but more often than not it will help to have tried this out a few times on other things to know how it acts. These materials are cheap as chips so have a go on the glossy side of your discarded drink carton or any non-porous material really.

Mix your desired sands remember that in miniature scale things will look very different, fine grit sand will look like gravel, medium grit will look like small rocks and coarse grit will look like large stones whereas slate chips will look like rock formations.
I usually mix the smallest amount of fine sand, a fair bit of medium sand and then a little fine grit and even less medium grit. I get this mixture and mix it with PVA glue, using a popsicle stick I place it on a base and let it dry, usually for a few hours. If I am trying to be particularly specific I will do two things. One I will ‘stand’ my model I have been working on, in this mixture once it has settled and is getting tacky. This will help give the idea of him being a part of the base rather than hovering above it. Then take out the model and the base is ready to paint.
The first thing you do with this mixture is, slap on some craft paint as the base because sand is very absorbent and you can actually add paint to the mixture of the PVA to help with the curing process but it sometimes adds to dry time and it means it is harder to stand the model in the base without ruining your paint job.
Once you have added your craft paint, paint on your desired paint, drybrush a lighter colour in the same range, pick out the rocks and now add grasses and ta-da! You have a great-looking base. The point is this slurry will help you out as it will help settle everything at the appropriate heights without you doing anything.
When this comes second
When you are adding rocks or other details to your base think about which is going to be sunken in more, rocks obviously will be sunken in more than this sand slurry so, you glue that on first, but what looks like rocks or rock formations? Cork and Slate are popular, however, there are also resin bits that can be sold by companies that make things. Or they can be 3D printed
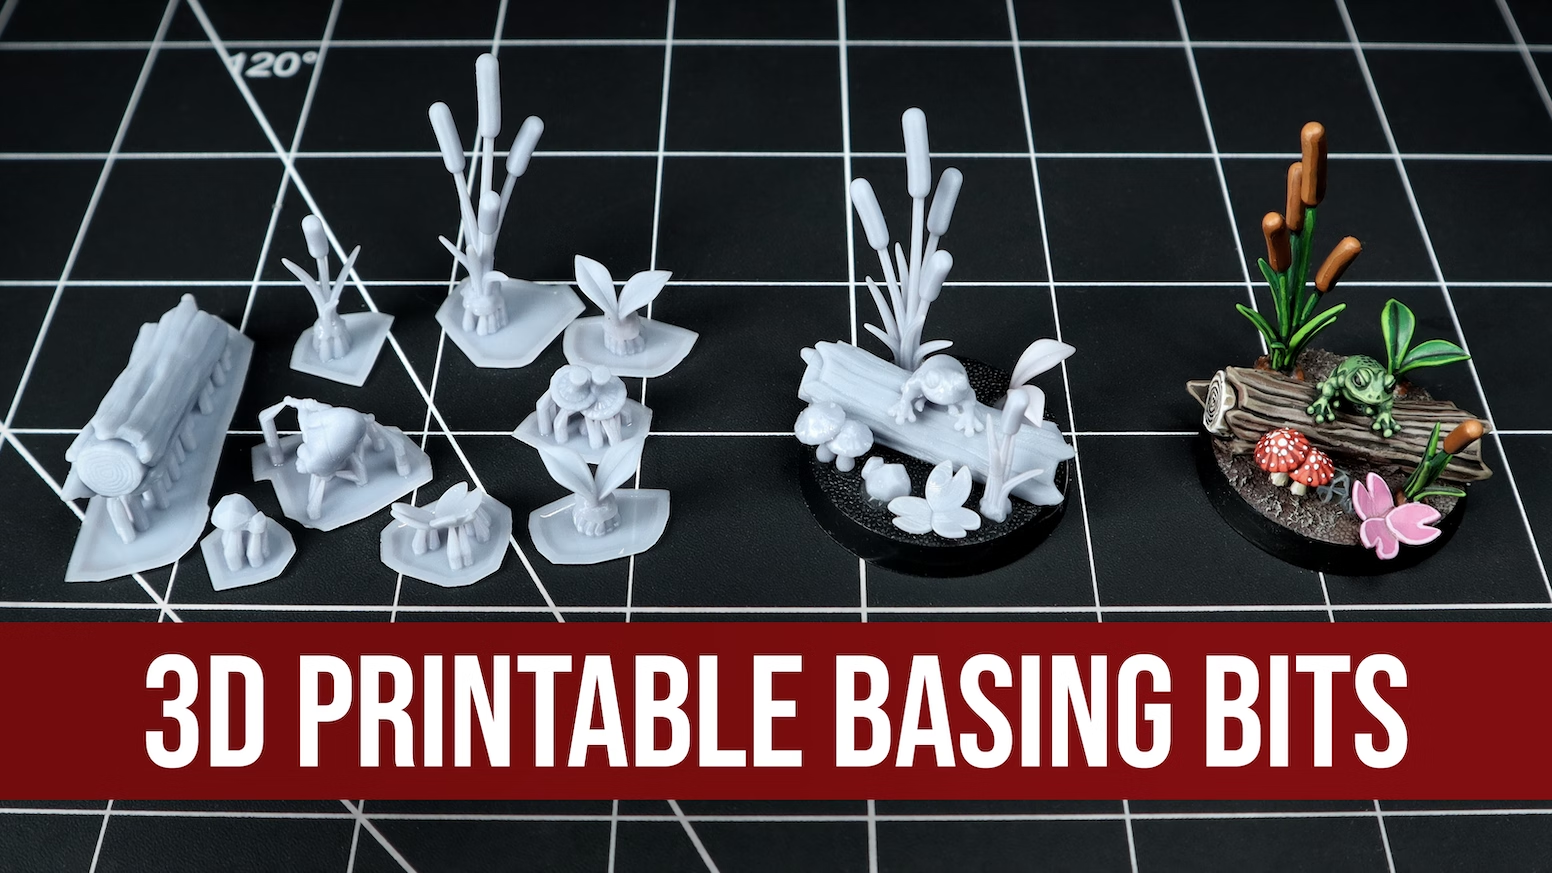
Look how the log sort of floats above everything here. remember whatever you are trying to achieve layer it like you would your paint job, so for me, for example even if I wanted this log to be whole I would place it down first with super glue and then put my basing slurry down. I would also do this for the larger reed but not as much for the smaller one because the larger reed has that dirt clod at the bottom which means I would better be able to integrate it into the base.
At least three elements
This is the other part of basing that people usually get wrong, your base like your miniature, should at least have three elements to it. A paint job should have at least three colours which was the minimum standard for a long time but your base should also have three elements. This doesn’t have to be super complex!


Each one of these bases is quite simple and just hits that basic rule but they help tell a story about where each of these people came from. The Bloodbowl miniatures have very basic bases, rocks, torn dirt, turfed grass and a white line which indicates a pitch. The story it tells is a game which is ongoing, with a pitch that has been worn out but wasn’t 100%, to begin with, but your eyes tell you the story well before I say something. The investigator on the top right is in a puddle with some rubble with dirt all around. Obviously this isn’t a stable place something has gone wrong here and this well-dressed gentleman in this place suggests that he has a job to do, what it is we do not know. The sculpted base of the bottom left drow elf indicates a highland of some sort however, just by adding tufts and adding paint to the tiny tree you get an indication of the season. The bottom right has two sets of tiles laid side by side but the fact that they don’t go together and are at odd heights indicates that something is wrong with this place. None of these bases is excessive but with very little detail you can tell a story about where this miniature is.
This should be your…
Final Step
This helps complete your model, you have set your piece in place you have told your story except there is one extra thing…
Why are you painting?
I am not so arrogant to believe that my way of painting is the only way. This is why I tried to show you many different people along the way. Trying to show you the various experts in their respective fields or the people I believe gave the most insight.
Thus we come back to question one. Why do you paint? I gave some options at the start.
So you can play the game
For self-improvement/improvement of your painting
For relaxation/the process of it
If you are number one well there is one more step that I believe is necessary for you.
Varnishing
Now if you are painting to create an art piece or for the process… This is a step I do not recommend and my reasoning for that is this, varnishing can take away a lot of the more nuanced details of your paint job and render them mute. However, if people are going to spend long hours touching these miniatures. Well… Then varnishing your miniatures is a must.
The process is very simple, you get your desired varnish, usually Matt Varnish or Semi-Gloss Varnish and you spray it over them, if you’re using a rattle can you should do it outside and know that things can go horribly wrong with that, especially in the hot Australian sun, or if there is humidity… Let’s just say if you are Australian and you want to use a rattle can know that it is your enemy and you are going to have do research on how to apply it properly depending on the brand and a number of other factors.
If you are using an airbrush as I recommend… know that varnish is going to clog the hell out of it and you are going to need to clean it… a lot. It’s not a complicated process but it can be quite reactive to weather if your indoor environment is as bad as outside…
Here is Miniac explaining it quickly
With this you are done and… so are we

Finale
I hope this article has been helpful and has helped you on your painting journey because that is what it is designed to do. I know some areas are more empty than others but quite simply I am making some assumptions about you when I write this. And I know the old saying that this makes an ass out of you and me when you assume, however, if you can’t direct to an audience you have no hope of writing anything.
I hope this is what you NEED to know not what you want to know. See people, when starting out most of the time they aren’t looking to know what is the best sort of clipper, and so on. But maybe just maybe knowing that painting is a physical skill will help you understand that hey, maybe I just need to get a few more hours in with the brush rather than endlessly binging YouTube tutorials in hopes I get better. Or just knowing these small tidbits will help you start your own adventure in painting… but most of all I hope one thing more than anything else.